Wednesday, 25 November 2020

Flowers That Bloom Even In The Dead Of Winter

~~~~~~~~~~

VIOLAS AND PANSIES

In mild climates they both violas and pansies will bloom for most of the winter and they even rebound in the spring in cold climates. Technically they are annuals but they do drop seeds so they will come back in the spring. Pansies were actually derived from violas, so technically all pansies are violas but not all violas are pansies.

WINTER BERRY

The Winter Berry shrub is a deciduous holly, meaning it drops its leaves in winter. Make sure you also purchase the "male" pollinator plant so it will produce berries.

WINTER JASMINE

Winter Jasmine is a medium-sized shrub has long, arching branches and bright yellow flowers. Winter Jasmine is not fragrant, but it is striking in the otherwise dull landscape of late winter.

CYCLAMEN

Cyclamen prefer winter sun and summer shade, so plant them beneath deciduous trees. This flower is often sold as a houseplant, but in mild climates, cyclamens in shades of pink, white, lavender and fuchsia are used as a cheerful ground cover. 

WITCH HAZEL

The Witch Hazel shrub boasts wispy-looking flowers on bare branches in February or March, long before much else is going on in your garden. Be sure to plant the winter-flowering variety because there are many different types.

CAMELLIA

Camellia is an evergreen shrub with lush white, pink, or red flowers that bloom from fall through winter. With hundreds of varieties, read the plant description or label to make sure you choose one that will bloom in winter.

GLORY OF THE SNOW

Glory of the Snow may through the snow in the coldest climates. They come in starry blues, pinks, and whites. They would look awesome in a rock garden or at the front of the border.

ENGLISH PRIMROSE

English Primrose are very dainty flowers and some of the earliest perennials to bloom in late winter to early spring, depending on where you live. With hundreds of types, be sure to choose one that can survive winters in your zone.

~

AND FINALLY THE POINSETTIA

The poinsettia is native to Mexico and Central America, where it grows in moist, wet, wooded ravines and on rocky hillsides. It was named for Joel R. Poinsett, who popularized the plant and introduced it to floriculture while he was U.S. minister to Mexico in the late 1820s. Cultivated varieties are available with white, pink, mottled, and striped bracts, but the solid red varieties, in several shades, remain in greatest demand during the Christmas season.

TAKING CARE OF YOUR POINSETTIA:

With proper care, your poinsettia will last through the holiday season and right into late winter. Play close attention to the following tips:

  • Place in a room where there is bright natural light but not where the sun will shine directly on the plant.
  • Keep the plant away from locations where it will receive hot or cold draughts.
  • Place the plant high enough to be out of reach of unmonitored children and pets.
  • Set the plant in a water-proof container to protect your furniture.
  • Water the plant thoroughly when the soil surface is dry to the touch. 
  • Discard any excess water which remains in the saucer after 10 minutes.

LAST BUT NOT LEAST: Will poinsettia kill your cat if they eat it?

  • Sap in poinsettia leaves is mildly toxic to pets (and children) and can cause vomiting, diarrhea, excessive drooling and nausea. 
  • In rare cases it can be fatal, but this is usually in young, elderly or dehydrated cats. 
  • Most pets don't eat nearly enough of the plant for this to happen.
  • SO NO IT WONT BUT IT CAN MAKE FLUFFY REALLY SICK. 

Tuesday, 17 November 2020

10 Reclaimed Wood And Pallet Christmas Decor Ideas

It amazes me how someone can take a piece of wood or a pallet and make a whimsical cute Christmas item. I wish I had that talent.....I Hope You Enjoy Them :)

~~~~~~~~~~~
So I had some extra wood lying around, and my sister and I decided to make a snowman family. They turned out PRETTY cute! CONTINUE READING >>HERE<<

Add some farmhouse charm to your front yard this holiday season with a rustic, wooden Christmas tree. CONTINUE READING >>HERE<< 

I had seen some Christmas Trees on Pinterest that were made from reclaimed wood and old pallets and I thought they were cute. I wanted to give it a go but wanted to add my own flare to them. The ones I had seen were just a little too plain Jane for my taste. So, using pallet wood, mod podge, napkins, buttons and some Wildflowers & Pistols Milk Paint I created my version of the Pallet Wood Christmas Tree :) CONTINUE READING >>HERE<<

4...Use A Pallet To Make A Corner Wall Christmas Tree
I found this on Pinterest and for the life of me I cant find any instructions for it so if anyone knows the original source please let me know in the comment section, Thank you :)

I’m embarrassed to admit, I can’t remember the last time I decorated outdoors for Christmas. Much of that has to do with the front door and side windows needing paint. And the concrete needing work. And the whole outside needing… a good farmhouse experience. Or something. Or a pretty for sale sign on the front yard would work wonders… When things aren’t up to par, they don’t make for great backgrounds! So as I was glancing around my festive, surrounding neighbour’s front porches of cute toboggans and pretty greens, I looked at my own mess, called myself a scrooge, and vowed to change that this year. With a Scrooge-less reclaimed wood Christmas tree and star for the front porch! CONTINUE READING >>HERE<< 

Good Wednesday Morning everyone! Thanksgiving came and went and I am now up to my ears in Christmas ornaments, scattering them throughout the house in every bowl, vase, and lantern I can get my hands on. Tis the season, right?! In the midst of all my indoor decorating, my husband stayed outside stringing the lights around each door and window. And when he finished that, he moved on to a new lawn ornament for the holidays. Adam has been wanting to do a pallet project for months now, and we finally decided on something we would both enjoy... a wood pallet Christmas tree. And we made it for a whopping $4! Inexpensive projects are truly my favorite ones! CONTINUE READING >>HERE<<

We are all great fans of festivals as they are way to promote our culture, to bring the cultural harmony and also to feel the freedom! We try our best to manifest our inner love and happiness for festivals about to come! The best way to express your feeling for the festivals is to decorate your home and surroundings with respective decors, signs and symbols related to that celebration! Now your festival is to come and these DIY wooden pallet trees would perform as best ever decor for that! CONTINUE READING >>HERE<<

8...Pallet Snowman
I found this on Pinterest and for the life of me I cant find any instructions for it so if anyone knows the original source please let me know in the comment section, Thank you :) 

Hello friends! It’s Marie from Blooming Homestead and I am excited to be here at Live Laugh Rowe to share this pretty DIY Woodland Sign. I adore cozy winter decor and I love decorating for the holidays. Sometimes it feels as though I am rushing to decorate from one holiday to another so I love when I can find fun pieces that work for a whole season. CONTINUE READING >>HERE<<

This easy craft will add some modern yet rustic charm to your holiday decor. You will need: Several boards from broken down pallets/hammer/stiff wire brush/gloves/saw/ measuring tape/carpenter's square screwdriver or drill with screwdriver bit/1 inch craft screws/white latex paint/water/paint brush/newspaper or drop cloth. Break pallets apart carefully and 10 good pieces from the top and bottom of the pallets. Look for pieces with character including knots and roughness. Clean the pieces by gently scraping them with the wire brush. Brush away any debris. CONTINUE READING >>HERE<<

Saturday, 14 November 2020

12 Crafts Using Concrete

Concrete is not just for sidewalks anymore or are they made from cement? (I googled it.....it's concrete). Anyways I just love the way concrete looks when it is used in furniture and craft projects so I thought I would these awesome ideas using concrete with you today.....I Hope You Enjoy Them :)

 
 ~~~~~~~~~~
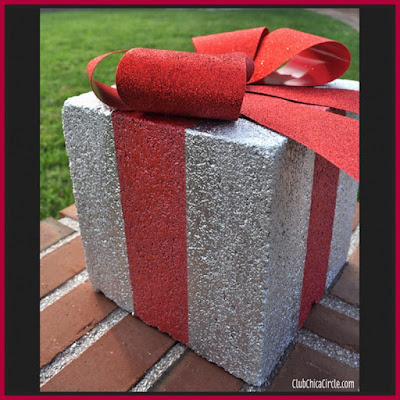
Do you decorate the outside of your house for the holidays? This is such a fun time of year to see all of the festive houses both in our neighborhood and just driving around. Today’s craft idea is a really great way to add some fun holiday decor to the outside of your home. turn simple concrete blocks into fun holiday gift boxes. CONTINUE READING >>HERE<<
 
This DIY Concrete Tray mixes the industrial texture of concrete with smooth brass to set a modern scene for whatever you’ve got on the menu. And in the case of Sugar & Cloth…macarons! But seriously, how cute would these be on this concrete tray?! Read on for the scoop on how to create one for your next gathering. CONTINUE READING >>HERE<<
 
I  have been looking forward to trying my hand at a concrete project for a while. But to make concrete projects, first, you need a mold. I thought concrete pumpkins would be a great way to start off working with concrete. But I didn’t want to make the usual run of the mill concrete jack o lantern. I also didn’t want to figure out how to create a mold first and then make the pumpkins. CONTINUE READING >>HERE<<
 
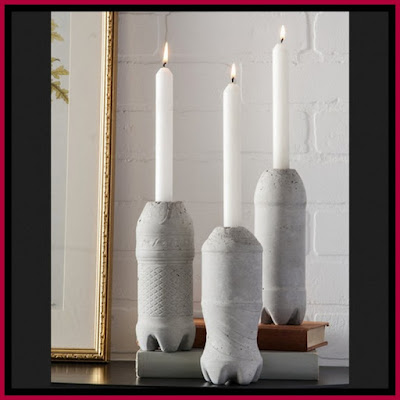
Make these easy DIY concrete candle holders using plastic bottles – the results are kind of amazing . . . I love my new modern decor! In my DIY concrete project roundup, I told you that my boyfriend wanted to do a home decor project with the stuff, and he finally completed his project. I present to you these cement candle holders made with Quikrete and plastic bottles (among a few other supplies). He had a great time with them, and I’m having an even more fun time sharing his first project. If you’re interested in crafting with concrete, these candle holders are a great place to start. They look so unique and we’ve gotten so many comments on them . . . plus they are made using recycled bottles, which is awesome. Here’s how they were made. CONTINUE READING >>HERE<<
 
The other day my husband messaged me from work, and said, “Are you still after a dead tree?” “Always!” I said.  I drove right over to pick up the tree. It was big. And beautiful. Perfect. “This is going to be an awesome tree sculpture” I exclaimed. “Art even!” He smiled, a funny smile, the like, “you’re crazy smile". CONTINUE READING >>HERE<<
 
Uh oh. I got my hands on some concrete and sorta maybe went crazy and am making ALL the things concrete. CAN. NOT. STOP. Not all of my projects have been successful, but I’m in love with the pieces that worked. Today I’m sharing my Concrete Honey Bear. He’s so cute. CONTINUE READING >>HERE<<
 
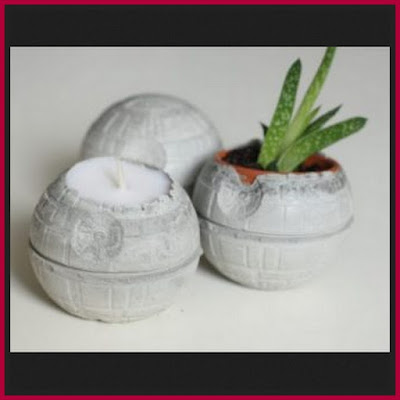
The new Star Wars 7 The Force Awakens is out! Who else is exited about that? In celebration of the new Star Wars movie and Christmas around the corner I did a little Star Wars related geeky DIY: Concrete Death Stars! But wait not just regular Death Stars but concrete Death Star Flower Pots and concrete Death Star tealight candle holders. How does that sound? It’s so easy and cheap to make. Want to know how? Well let’s get started! CONTINUE READING >>HERE<<
 
In this article I show you a fun and creative tutorial on how to DIY concrete table numbers for your own wedding or other event! Have you noticed the concrete trend all over the place? I jumped aboard the concrete train and went to town creating table numbers. And let me tell you, these were so quick and easy to make. They only took around 10 minutes in total to produce — drying time not included. CONTINUE READING >>HERE<<

Friday, 13 November 2020

3 DIY Chalk Paint Recipes With 4 Crafts And 3 Furniture Makeovers Using DIY Chalk Paint

The other day I was looking to buy some chalk paint and boy oh boy that stuff is so expensive. Chalk paint is an awesome product and it get it's name because it covers furniture and crafts projects with a soft, chalky patina that gives your furniture an incredible antique look and your craft projects a gorgeous Farmhouse look.

With some basic ingredients you can make your own so I went on an internet search and I found tons of recipes and basically there are three types. They are: 1. Plaster of Paris 2. Baking soda 3. Unsanded Grout (the three chalk paint recipes are below).

The one reason chalk paint is so awesome is because it requires no prepping or sanding. And you can paint outside or inside. It dries quickly provides a beautiful patina and your distressed projects come out looking wonderful with little effort.

Chalk paint applies smoothly and it dries quickly and it can be easily sanded down to make your piece have that farmhouse or distressed look.

How To Make One Cup Of Chalk Paint

There are two simple steps:
1..Mix the Plaster of Paris or baking soda, or unsanded grout and water together enough to remove all the lumps.
2..Pour the plaster of Paris for baking soda or unsanded grout mixture into the paint. Stir until all of the mixture is dissolved and there are no lumps.

Plaster of Paris chalk paint recipe
1 cup latex paint
1-1/2 tablespoons water
2-1/2 tablespoons Plaster of Paris

Baking soda chalk paint recipe
1 cup latex paint
3 tablespoons cool water
1/2 cup baking soda

Unsanded grout chalk paint recipe
1 cup latex paint
1 tablespoon cool water
2 tablespoons unsanded grout

I just love crafting with diy chalk paint because you can buy brand new stuff from the Dollar Tree or Dollarama and use diy chalk paint that you made yourself and change it into something else or make it better. You can make your own expensive designer store candlesticks by using your diy chalk paint and going to the Dollar Tree or Dollarama and buying dollar candlesticks. But by far my favourite crafts with diy chalk paint is using it with mason jars. Below is an example of four crafts using diy chalk paint and mason jars. I hope you enjoy them.

4 Crafts Using Mason Jars And DIY Chalk Paint 

When you don't have a lot of money or you're frugal or you want to save the planet, it doesn't matter which one you are or if you're all above or none of the above refurbishing furniture with chalk paint is one of the most satisfying and awesome makeovers you can do. When you have an end table, coffee table or shelf that has great bones but it's ugly all you need is chalk paint. You can even paint chairs and couches. that's right you can paint material if you prep it right and add fabric medium to the chalk paint. I have chosen 3 makeovers below and one includes painting an ugly armchair. I hope you liked the selections and I know you're going to enjoy them.

Wednesday, 11 November 2020

2 Ways To Refurbish A Second-Hand Dresser Using Paint or Modge Podge

Buying  brand new furniture nowadays is so expensive so why not just refurbish a second-hand dresser or one you have in the basement or the one in your bedroom. If you have a brown dresser and everything in your bedroom is black and wh10 Edible Crafts For A Child's Christmas Partyite paint the dresser white and paint the dresser drawers black or vice versa. Or you can modge podge it any design you want. You can even use the flat sheet of a sheet set and modge podge it to the drawers of the dresser so your dresser matches your linen. What a great idea. The choices are endless.


1...HOW TO MODGE PODGE A DRESSER

Try to find a second hand dresser that isn't varnished for already painted. But if you can't find one the next step is to remove all the hardware and sand your dresser to remove all the shininess and make sure you wipe it down with a soft damp rag to get all the residue off. Let it dry.

Choose the material you want to modge podge with. Example: pictures that you photocopied, wallpaper, scrapbook paper, newspaper or wrapping paper. The choice is endless.

Cut the material you choose to size. Measured the dresser drawers fronts or top of the dresser, wherever you plan to place your paper.

With a painting sponge, paint a thin layer of Mod Podge on the drawer and apply your material evenly and smoothly over the top. Apply two to three coats.

Allow about 20-30 minutes in between coats for drying, and let all the drawers dry face up overnight before attaching the hardware and placing them back into the dresser.

HERE ARE THREE EXAMPLES OF DRESSERS 
THAT WERE MODGE PODGE 

1..Fiskars.com
2..Missmustardseed.com
3..Angieawcay.com

2...HOW TO PAINT A DRESSER

Sanding, priming and painting the dresser can be a very messy job so you should lay down a drop cloth. We want to keep the spills and splatters to a minimum and this will protect your floors. Remember to paint in an open area. Example: your backyard, your garage, or your workshop because paint fumes can be overpowering. And don't forget to make sure your drop cloth is taped to the ground or use paint cans or rocks to keep it down if it's windy out the day you decide to paint.

Remove the drawers from the dresser. Sand the dresser with a medium grit sandpaper (80-100 grit sandpaper) and gently scruff up the entire dresser because you want to remove the finish off the dresser as it will be easier for the paint to adhere. After you're done sanding take a damp cloth and wipe the dresser down. Let it dry before you start to paint

Paint the dresser with one coat of basic white primer. Allow the primer to dry for 4-6 hours. Use a latex paint recommended for indoor use but you can use either oil or water based paint. A single gallon of paint should be more than enough to do your dresser but it's important to keep your layers even and don't use oil based paint over water-based paint or primer or vice versa as it will peel off.

Paint the dresser and drawers separately with two coats of paint each. You will need to let the first coat 2-4 hours to dry to give the paint time to begin hardening before you can follow up with a second coat.

Finally after the topcoat has had time to dry, roll or brush on a final clear coat of varnish to seal the new paint. Spread the varnish in a thin, even layer over every surface of the dresser that you painted. Like the other coats, it will need 2-4 hours to dry.

HERE ARE THREE EXAMPLES OF DRESSERS 
THAT WERE REPAINTED